Monday, November 7, 2016

DIY Fabric Ice Pack

My mom worked at a daycare for a while and they always kept bean bags or rice bags in the freezer to give to the kids when they got hurt.

I started this with my little guy from day one so he would get used to having me treat his cuts, bumps and scrapes.


I used to have rice bag ice packs where I placed the rice directing into the fabric and sewed it in. But when my little guy gets scrapes or hits his mouth he can bleed, and then my fabric ice pack is covered in blood and un-washable because it's full of rice.


 Also this old ice pack could be put in unsavory places such as stinky feet and then be used the next day on a chin injury. Kind of grossing me out, just saying.

Here is my New and Improved ice pack!

This pattern allows for your rice to be separate and safe in a plastic zip bag (I chose snack size). The outside fabric part is removable and washable for those nasty falls that result in bloody knees, elbows, lips, etc.

He absolutely loves Batman right now so I made some new ice packs with some Batman fabric. This is a sewing project but I'll try and give you some non-sewing tips as well.


First you'll want to make your pattern. I used a piece of construction paper that I cut to measure 6 1/2 inches by 7 1/2 inches. (If you want more seam allowance bump it up to 7x8 inches)
Pin this pattern to your fabric and cut it out.


Next you'll want to hem the short ends. If you don't have a sewing machine, you can get some pinking sheers and cut the short ends to help with fraying.


Get your ruler or measuring tape and mark the long ends with a pin at 2 inches and 5 inches on both sides.


 Fold your fabric on the pins, right sides together.


Put pins on top to hold the fold in place. You can also use an iron in this case to make the fold stay.


Fold both sides over so they're overlapping, and pin in place.


Sew these sides. Then flip your ice pack right side out. If you don't want to sew use your pinking sheers on the long sides and then hot glue the sides together. (I haven't tried the hot glue so I'm not sure how well it holds up under extreme cold.)


Measure a little over 2/3 cup of rice. Put the rice in a snack sized plastic zip bag. Get out as much air as you can.


 You could also use a sandwich sized zip bag and just fold over the excess bag.


Place the plastic bag inside your fabric ice pack and fold over the sides.


Place in the freezer for a soft, not too cold, cure to your little ones bumps and scrapes!


Thursday, September 22, 2016

Re-Gifting

My family and I are on a tight budget at the moment but I still want to take gifts to our friends weddings. So I have become resourceful re-gifting free stuff I have received.

I would say the first key to giving free gifts is DON'T throw everything away. Hang on to the good stuff that you could re-gift, or even use as gift wrap.

The tulle I use in these gifts was fabric used at my own wedding reception 6 years ago. My mother-in-law used it as part of the greeting line and let me keep it after word. It smashes down pretty small, so not a lot of storage space taken up.

I've also held onto gifts we received but never used. 


 This gift was a set of kitchen tools we never opened that we got as a gift at our wedding.
 To make it look nice I took it out of the box and wrapped some burlap with tulle around the base of the container.

I also tied some tulle around the utensils to make them stand up and not fall together.
 Then I took out some threads from the burlap to
tie the top of the tulle together instead of
using a ribbon.


 I inserted a card and voila!


I thought it turned out pretty nice.


This next gift, believe it or not was totally free!

 My husband brought the  "LOVE" blocks home from his job last year around Christmas time when his company was raffling off product samples they had received. I think they're super cute but I have no where to put them. I held on to them and new they'd come in handy.

The baking pan, whisk and measuring spoons I got from our friends who got married a while back. They were both already set kitchen supplies wise and let us pick through the left overs.

The cookie mix I got lucky to receive. It came from my mother-in-law who has celiacs disease. She got it as a Christmas gift from people she worked with. I never used it so it made a great addition to this "cooking up some love" gift.


 Our friend's fiance has a 3-year-old girl and I thought it would be a nice addition
to give her a small gift too.
 I was fortunate enough to be handed a bag full of plastic animals in all shapes and sizes. I've only given my son a few here and there as prizes for road trips and things, so I still have a lot left over. I found as many cute and small farm animals as I could and put them in a box for her. Yet again free toys.
 I pulled up my tulle and used a clear twist tie. Then later I added the ribbon.

 I wrote on the card, " The most important ingredient in any marriage is LOVE." 
Cheesy? Maybe, but super cute.


So moral of the story: If you're given/offered something free that is legit, think twice before throwing it out or turning it down. Be thrifty and creative, anything could be re-gifted!

Monday, January 11, 2016

Sweet Potato Hash

      With a new year I am revamping my diet to include less sugars and more vegetables. I had a friend tell me once that it's good to stay away from the "white food group." Things in the white food group include: white rice, white potatoes, white flour, white bread, etc. When she told me this I started buying sweet potatoes instead of regular baking potatoes.

      One of the recipes for sweet potatoes I recently tried was a sweet potato burger. (It was kind of a flop but my husband enjoyed it so I was glad about that.) Anyway I cooked a sweet potato and didn't use all of it in the burger mixture so I was trying to figure out a way to use up the rest of the cooked sweet potato. That's when the Sweet Potato Hash was born!

      I had to look up the definition of "hash" because honestly I wasn't sure what went into a true hash. A  hash is basically chopped meats, potato seasoning and other ingredients such as onions. The first time I made this I was just throwing things together and man was it delicious!

This is what goes into my sweet potato hash:

green bell pepper, chopped (but you can use any color or all three is you want)
onion, chopped
bacon (I use precooked and dice it)
cubed cooked sweet potato (I boiled/steamed it in slices first)
cubed tomatoes
and a fried egg to top it off


    All you need to do is chop up as much of each ingredient as you choose. It depends on how much you want to eat by how much you chop.


    First I sauteed the pepper, onion and bacon in a frying pan over medium heat.


    Then  push the onion, pepper and bacon to one side of the pan and add the sweet potato. Keep the heat at medium so you can get a nice brown on your sweet potatoes. (My heat wasn't high enough so I didn't get that nice brown, and i forgot to push everything to the side.)


    Then I cubed some tomato and added it for a few minutes at the end of the cooking.


    I transferred my sweet potato hash to a plate and then fried an egg in the same pan I cooked the hash in. Then I topped my hash with my egg (sorry it doesn't look that appealing, but it tastes delicious.)


    I like this sweet potato hash because it doesn't have as much starch since there are no white potatoes. The tomatoes also add a nice freshness.
    Feel free to anything you want to this: green onion, cilantro, jalapeno, etc. The possibilities are endless!

    Enjoy your sweet potato hash!

Wednesday, January 6, 2016

Orange Cranberry Muffins


I got a bag of fresh cranberries in my Bountiful Basket a few weeks back and have been at a loss about how to use them. (My son will actually eat them like popcorn... but that's not my favorite snack.)

On the bag of cranberries was a recipe for lemon cranberry muffins but I prefer orange with my cranberries so I tweaked it. I am also trying to avoid processed sugars so these muffins are only sweetened with Stevia, honey and agave nectar.


I hope you enjoy these muffins as much as I do!


Ingredients:
2 cup fresh cranberries (sliced)
1/2 cup milk (you can substitute your favorite kind of milk, like almond, coconut etc.)
1/2 cup Agave & Honey (I filled my 1/2 measuring cup 2/3 full with agave and the rest with honey)
1/4 cup powdered Stevia
1/4 cup coconut oil (melt to get it in a liquid form)
1/4 tsp salt
2 large eggs
Zest from one large orange (you can use lemon zest if you prefer)
1/2 tsp vanilla
2 tsp baking powder
1 1/2 cup flour
1/2 cup almond flour (you can leave this out, but be sure to add 1/2 cup of regular flour in its place)


Mix together: Milk, agave/honey/stevia, salt, eggs, oil, vanilla & zest
In a separate bowl mix together the flours and baking powder.
Then add these to the wet ingredients till fully combined.
Fold in your sliced cranberries.

350 degrees Fahrenheit
Bake 18-20 minutes
makes about 20 regular muffins
Enjoy!


Wednesday, July 29, 2015

Checkerboard Cake

I send my husband to work with cake and treats sometimes, and basically spoil his co-workers.
So when my husband put in his two-week-notice the first thing one of his co-workers asked him was, "So, is your wife going to make something for your last day?"

When my husband told me this I just laughed. It would appear they'll miss my baking more than they'll miss my husband.

I told him I'd be happy to make something for his last day and to ask for requests.
The the request was, "A cake with your face on it."

I told my husband that drawing a face with frosting probably wouldn't turn out very pretty and he informed me that that was the point of the request. They were looking for a good laugh.

Where my husband works I've had the opportunity to sell cakes and have my husband advertise for me. So in order to keep and gain some clientele I wanted to go out with a bang!

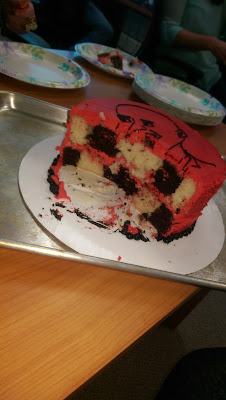
I decided to make a checkerboard chocolate and vanilla cake. I wanted the inside to look pretty to compensate for whatever was going to end up on the outside.


To make a checkerboard cake you need one vanilla 8 inch layer and one chocolate 8 inch layer. (You can do as many layers as you like but I only had time for two. Also be sure to level both cakes before cutting, in my rush I forgot a lot of steps so my cake doesn't look as flawless as I'd like)

After the layers are baked and entirely cooled cut out two circles in each layer like you're making a target. Before cutting it's a good idea to place the cake in the freezer to stiffen it.
I also placed it in the freezer after cutting but NOT before removing the cut out circles to stiffen again.
It is also important to measure each circle to end up the same size so corners line up inside the cake. (I wasn't very careful and didn't take the time to measure because I only had one day in which to make the cake and I wasn't about to stay up till one in the morning.)

After each layer is cut to look like a target remove the inside rings and alternate, vanilla, chocolate; chocolate vanilla as shown:


After you have your black and white targets just stack the cake as you normally would with frosting between each layer. Then you can dirty ice it. Let it harden in the freezer for 10-20 min and then put your final top coat of frosting on.


Then came the decorating part. I first took a picture of my husband in the pose I imaged.


I then tried to edit the photo on my phone to make it look like a pencil sketch.
(I decided that just doing an outline of his facial features would be easiest.)


After doing a very rough sketch with a toothpick on top of the cake I grabbed my piping bag and began my endeavor. I personally think I couldn't have drawn something better with a pencil. Frosting is my choice of medium in the artistic world and I think it suits me.


What do you think?!

I decided to pipe a beaded border around the bottom and leave it simple. The cake is red and black because I recently did a Mickey Mouse cake for a client and I had a lot of frosting left over. One of Brian's coworkers thought it looked like a Lenin cake with the red and black. HAHAHA!


Anyway I think it turned out great and his coworkers had a blast looking at it and eating it. My husband put it on his bosses desk before she got to work and when she walked into her office she busted out laughing. I'm glad my cakes can entertain people as well as be satisfying to eat.


Wednesday, February 25, 2015

Homemade Rice-A-Roni, MSG Free

My husband and I love Rice-A-Roni. I grew up eating it and it makes a great quick dinner for your family. Lately I have become more consciences of what is in the foods I buy and unfortunately I've noticed that Rice-A-Roni has MSG in it. I was super sad but decided I would try and make my own homemade version of Rice-A-Roni.

I'll cut to the chase and give you the recipe:

1/2 cup Arborio Rice
1/2 cup Acini de pepe pasta
1/2 to 1 lb ground meat (beef or turkey your choice)
1/2 medium onion diced
2 1/3 cup chicken broth (you could use beef broth, veggie broth or even water and add bouillon)
2 full twists from your fresh pepper grinder
3/4 tsp dried basil
1/2 tsp Season All
1/2 tsp powdered garlic (if you use garlic salt, reduce your Season All. I personally dislike garlic salt because it's forcing me to put extra sodium in my food when all I want is the garlic flavor.)
1/2 tsp dried mustard (one of my favorite things, not sure why but I put it in almost anything I'm trying to spice up)
2 Tb. Butter


Step 1: Cook the ground meat and onion in a deep frying pan. When fully cooked drain fats and set on a paper towel.

Step 2: While meat cooks combine all your seasonings and broth together.

Step 3: Place butter in the hot frying pan till almost melted and add the arborio rice and acini de pepe pasta. Stir frequently till pasta begins to brown. Add the meat and onion mixture back in the frying pan.

Step 4: Slowly add the liquid and seasoning mixture to the frying pan and stir once. Bring to a boil and then lower heat to a simmer. Place a lid that on and leave a vent. If you don't have a large enough lid just place some tin foil on top like I did.

Step 5: Stir occasionally making sure the rice and pasta doesn't burn. Simmer for 20 minutes or so, occasionally taking a taste of the rice and pasta to make sure it's cooked thoroughly.

Step 6: When it's done cooking serve with veggies and top it off with my favorite: Sour Cream!

Enjoy your Homemade Rice-A-Roni that is MSG free!


Wednesday, January 7, 2015

Ombre Wedding Cake

I think it's about time I posted a picture of my very first wedding cake. The reasons for the delay is because I made this cake in the process of moving. Literally. I packed up my house, my husband and child left town, I stayed in an empty house and proceeded to make the cake. It was intense but now I am settled in a new home in a new city. So here is my pièce de résistance!


Bottom layer 12" = German chocolate with the traditional frosting as filling
Middle layer 10" = Spice cake with an apple pie filling
Top layer 8" = Funfetti cake (per brides request) with a strawberry filling


This beast of a cake weighed a ton and took 20 hours to make, bake and decorate.
It was an ivory-ish ombre with burlap flowers. (the mother of the bride made the flowers)

The bride loved it. I was super proud of my creation and can't wait for the next time I get to create something so beautiful and delicious!

P.S. All of the cake (except for funfetti) and filling was made from scratch. Go big or go home!