Thursday, May 1, 2014

Bread abounds with no loaf pans around


     Do you ever have the urge to make bread but realize that you don't have a bread pan available, or your recipe makes more loaves then you have pans?
Never fear the casserole dish is here!
Here is a fun tip for those of you without a bread pan or with not enough bread pans.

     In writing this post I was trying to decide where to begin. Should I tell an extensive back story like some crazed evil scientist?
     Should I ramble on and on about my all encompassing love affair with bread and anything gluten? Perhaps I'll reveal my darkest fear that my husband and children will be diagnosed with celiac disease and I will have to say good bye to my beloved flour forever!
     I'll relate the tragedy of my broken bread pan leaving me with only one pan and a recipe that makes 5 loaves. Maybe after typing paragraph on paragraph I will stumble upon the stroke of genius I had for the make shift bread pan.
     Eventually you become so bored you skip to the very end to get to the soul purpose of this blog post where I explain how to turn your casserole dish into a bread pan ... I thought not.

So here is what you need:
9x13 or 8x8 casserole dish
tin foil
non-stick spray

Directions :
   Make your bread and while it's rising the first time cut 4 or 3 pieces of tin foil depending on your size of pan (9x13= 4; 8x8= 3)
    These pieces of tin foil should be the width of your pan and be fairly tall so it holds the bread in as it rises.

In this first picture (which was taken on my beautiful stove in my old house) I didn't put tin foil on the sides so the bread spilled over the edges.


I did not like that so the next time I made bread I used tin foil on the outside edges as well as in the middle. This picture was taken at my new house on my not so beautiful stove, and my loaves got a little over cooked on top unfortunately
  

But as you can see both times I got perfectly shaped loaves by just using a casserole dish and tin foil!


I hope you try this if you're in need of more bread pans cause it really does work. Also here is a link to the bread recipe I found that I now love! It says to make two loaves but I always get 3 huge loaves, (as shown in the last picture) or 4 smaller ones (as shown in the middle picture).  

Hope you enjoyed my post and happy baking!!

Wednesday, April 16, 2014

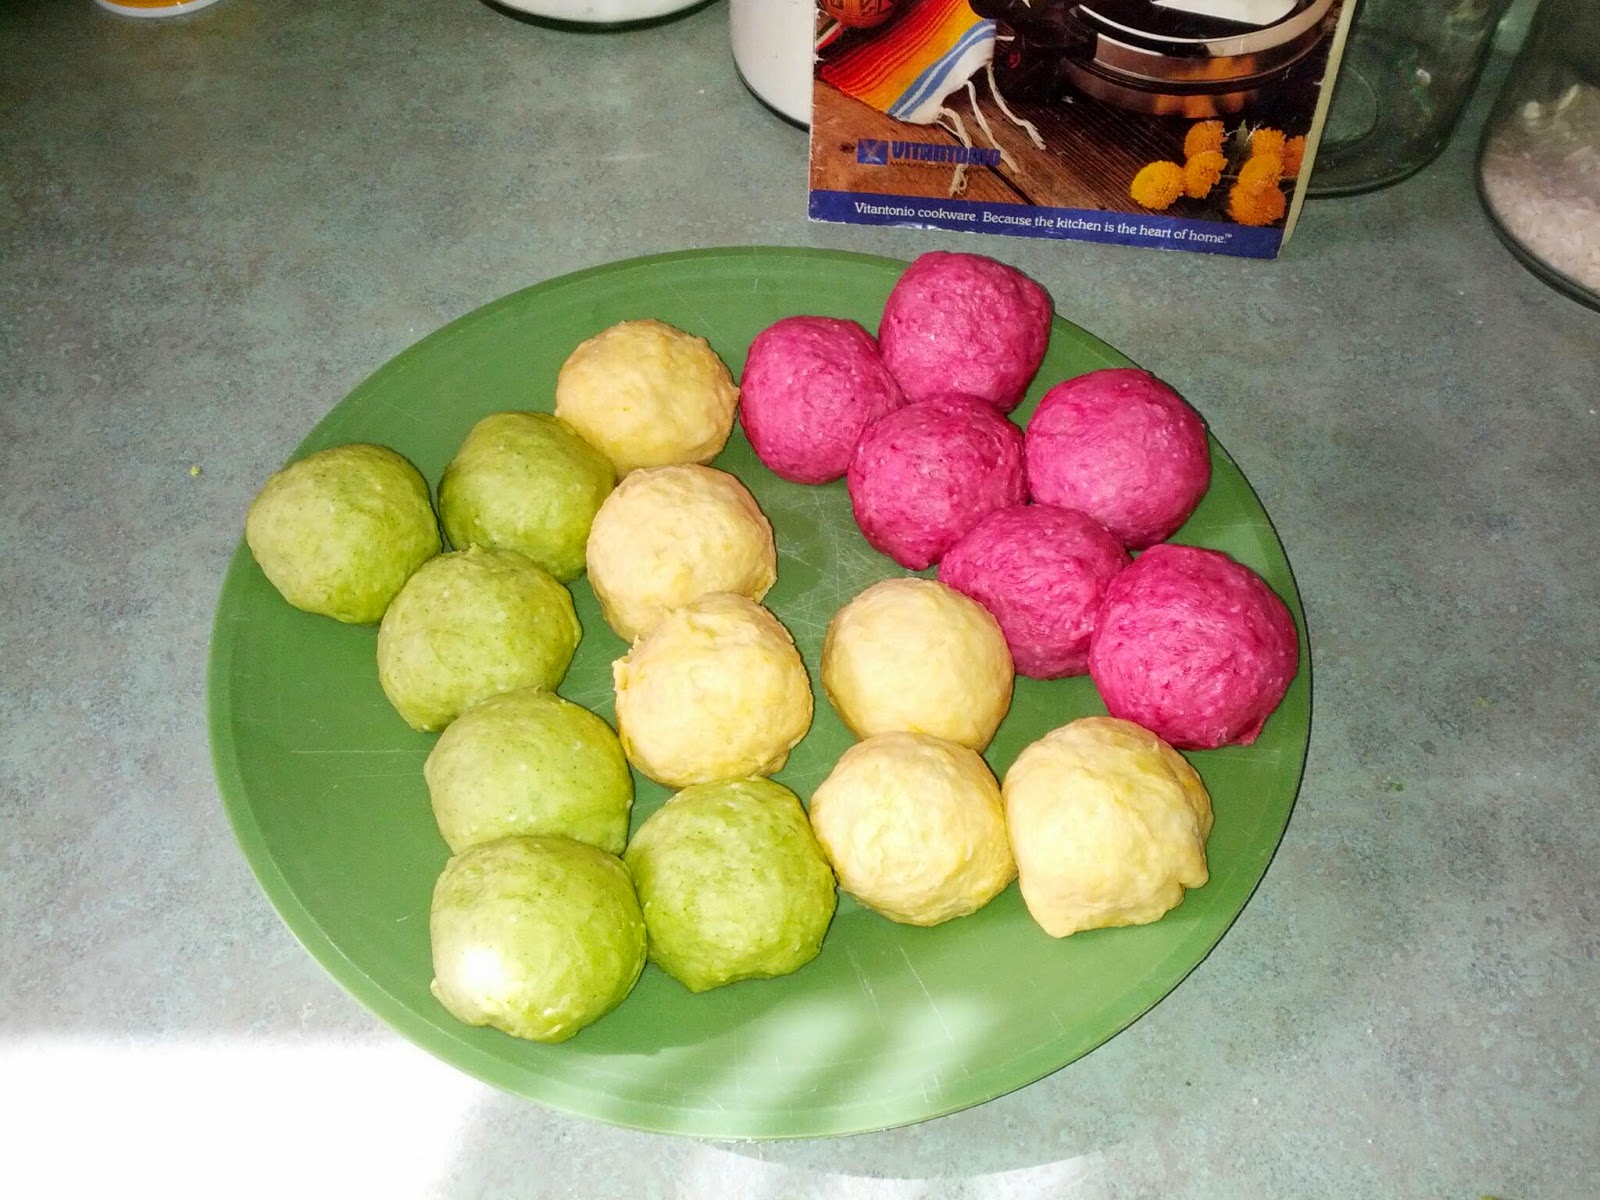
Cinco de Mayo tortillas with organic coloring

For my Cinco de Mayo party this year I wanted to provide fresh homemade tortillas for everyone to enjoy. My husband suggested we color the tortillas too. It was super simple and completely organic.

I made green, red/pink and orange tortillas using Pure Synergy Organics Carrot Juice Powder, Beet Juice Powder, and Kale Juice Powder. It would have been preferable to use the Tomato Juice Powder to make red tortillas but I was all out.

Here is my super simple recipe for homemade tortillas.
(You don't have to use the juice powder, you can just have plain white tortillas)

2 cups white flour + 2 tsp separated (feel free to substitute the white flour for wheat or organic)
1/2 tsp salt
1/4 cup vegetable oil
2/3 cup warm water

Here are my measurements for the juice powders, you can use more or less if you like:
Green tortilla: 2 tsp Kale Juice Powder
Red tortilla: 1 tsp Beet Juice Powder OR Tomato Juice Powder
Orange tortilla: 2 tsp Carrot Juice Powder

Step 1: Combine your flour and salt in a bowl. Then mix in one of the organic juice powders for your choice of green, red or orange tortillas.The color will be very faint so be careful not to put too much organic juice powder or not enough (I accidentally didn't add enough carrot on my first batch of tortillas, which you will notice in the pictures).

Step 2: Pour in the oil and combine it with the flour using a fork. You want to mix it in until you have little balls of oil and flour that are about pea size in shape.

Step 3: Mix in the warm water. (Once you put the water in the color really starts to show up.) Combine it all together with a fork and then use your hands to knead the tortilla dough about 10 times. This is when you may need to add the 2 tsp of flour depending on how sticky it feels.

Step 4: Now you're going to shape your tortilla dough into individual balls. I use my digital kitchen scale and make each ball 1.5 ounces. Obviously you don't have to use a kitchen scale if you don't have one, just make the balls into equal sizes. ('m just a perfectionist when it comes to things being equal size.)
After you've formed your tortilla dough into balls cover them with plastic wrap and let them rest for 30 minutes. I take the plastic wrap off for the last 15 minutes so the dough isn't too sticky when I start cooking.
 

Step 5: Bake the tortillas. If you don't have a tortilla maker you can just use a rolling pin to flatten your tortilla dough and cook them in a hot frying pan.  If you've never used a tortilla maker before it's fairly simple:

First warm up the griddle with the top open. Once it's warmed up place a ball of dough near the back of the griddle as shown.

Then you're going to put the lid and handle down and press firmly and quickly to flatten the dough. Then quickly open the lid so the dough can rise and bubble. Sometimes the dough may stick to the top lid and you'll have to carefully scrape the tortilla off with a spatula. 
(This is why I let my dough rest with no plastic wrap so the dough becomes a little dry.)

 
Let the tortilla cook for 2 to 3 minutes on each side and then you're ready to eat. 


Add your favorite toppings and have a fun Cinco de Mayo!


Friday, July 12, 2013

Camp Cupcakes and Homemade Frosting

With summer in full swing what better way to enjoy this beautiful world and your family than by camping! And who doesn't want a tasty treat to enjoy around the camp fire.
Here are some fun decorative cupcakes that will remind you of those happy camping memories. They're also a great treat to take up the mountain to enjoy those first few days, depending on how long they last with the kids around. I've also included a simple homemade frosting recipe!


What you'll need for the cupcakes:
1 cake mix
1 tube of graham crackers
crushed up red hots, or coconut died red (click here for how to dye your coconut, under step 10)
cupcake papers

What you'll need for homemade frosting:
1/2 c shortening
1/2 c butter
1 tsp vanilla
4 c powdered sugar (1 lb.)
2 T. milk
Green and brown food coloring (you can use powdered cocoa if you don't have brown food coloring)
2 piping bags
Piping tips: 5, 8 and 233


Step 1: Mix the cake as directed and divide into cupcake pans. Bake as directed. When done baking let cupcakes cool completely on a cooling rack.

Step 2: While cupcakes are baking we'll make the homemade frosting.
In a bowl combine powdered sugar, shortening and butter. Sometimes I'll just use all shortening. This way I get a super white frosting.
Mix these two together until combined. It will be crumbly.

Then add the milk and vanilla. If you're going for a super white frosting for future creations you can buy clear vanilla flavoring at the store. If you are going to color your frosting, as in our case, then using the regular brown vanilla flavoring is just fine.
You may need to add more milk to help with consistency. You don't want your frosting too think or too thin so only add extra milk a little at a time.
This homemade frosting is super easy to make and is delicious!


Once you've made your frosting it's time to color it. We want green for the grass and brown to secure the tent and make the logs. You can also make red frosting to replace the coconut/red hots as the flames.

Set aside some white frosting in a separate bowl to use for a different color. Other wise use the majority for the green grass. Color the frosting until you reach a desired shade of green. I like to use Wilton's food coloring because it doesn't make the frosting a neon green, it's a more natural color. For the brown frosting you can add food coloring or add powdered cocoa. If you're adding cocoa add it 1 tsp at a time until you reach a desired shade. I started with a light brown to match the graham crackers and then added more chocolate later on to make the logs a darker color.


Step 3: While your cupcakes are cooling you can cut out the sides for your tents. For this cut with a serrated knife along the dotted lines on your cracker. Then cut each piece in half hamburger style. Depending on the kind of graham cracker you have you should either end up with 4 or 8 small squares or enough for 2 or 4 tents. Each of my crackers only made 2 tents, 4 squares. Be careful when cutting your crackers so you don't break them or else you'll end with a lot of cracker crumbs.


You can also smash your red hots at this time. I had to put my red hots in a bag and then crush them with a hammer. I was lucky my downstairs neighbor wasn't home at the time.


Step 4: Put your piping bags together one for green with tip 233 and one for brown with tip 5 to start with, tip 8 we use for the logs to make them thicker. Because these cupcakes represent the outdoors, which isn't perfect, you can stripe your piping bags with extra green and brown food coloring.


All you do is use a paint brush, finger, cotton swab or something similar and make a few stripes on the sides of the piping bag before putting in your frosting. I forgot to stripe my green bag but the brown turned out amazing making cool lines like bark on a log.


Now with your 233 tip you're going to pipe grass on all of your cupcakes. If you're not used to piping your hand and wrist will get tired very easily, very quickly so do this sitting down while watching something. Also remember that grass out in the wilderness is not perfect so if some is short, and some long, and some gets squished don't sweat it!


Step 4: Now that we have grass time to place the tents. Take 2 small squares and lean them against each other on one side of your cupcake to form a tent. Don't put your tent in the center of your cupcake or you won't have room for a campfire. Then take your brown frosting with the 5 tip and pipe a line of frosting on the top of your tent where the two squares meet. This will hold it in place so the tent doesn't fall over.


After you put tents on all your cupcakes you can squirt the remaining brown frosting from your bag into the brown bowl if you need to make a darker shade of brown for the logs. Then you can stripe your bag and place the brown frosting back in the same bag but use the 8 tip. You don't want to use anything bigger than an 8 so your logs are super fat.


For the logs I just piped an X in front of each tent. Then I placed/sprinkled some of my crushed red hots in the center of the X to look like either flames or hot coals. You can also use coconut or just red/orange frosting. If you pipe your flames do an orange frosting and stripe your bag with red food coloring for a fun effect!


After you put the flames on your cupcakes are done and ready to be devoured! I hope you have fun with this camp treat and that you enjoy the homemade frosting and never go back to store bought again.  ;-)

Let me know how your creations turn out and how you enjoy the homemade frosting recipe.


Wednesday, July 3, 2013

4th of July Flag Cake


Happy 4th of July!
Here is a recipe that will leave your guests in awe and it's not just the fireworks they're impressed with.

This is an American Flag cake where when you cut each slice it will look like a flag.
Here is what you'll need:

3 white cake mixes, enough for 3 9in cakes
9in cake pans, if you don't have a 9in or aren't sure what size you have any size will do but you probably won't need as much cake batter if they're smaller than 9in
Blue and red food coloring
A mixing blow with spatula and wisk, or you can use a hand mixer
Wax paper
Toothpicks
Flower nails (click here to find out what a flower nail is)
2 batches of white frosting or at least 3 small cans of frosting from the store
2 piping bags with 2 star tips
1 cardboard cake circle that is lager than the size of your cake pans
Tinfoil


Directions:
You will be making 3 cakes each a different color: red, white and blue. If you only have 2 or even one cake pan of the right size only make one cake mix at a time. You don't want your cake mix sitting around letting the leavening waste away before it gets in the oven. I only had 2 cake pans of the same size so I made one quickly after another so the first wasn't sitting too long.

1)  Before you make anything you want to preheat your oven and prepare your cake pans to receive the batter. Trace the bottom of your cake pan onto the wax paper and cut out a circle for each pan. I reused my wax paper for 2 cakes to save on waste. If you have a flower nail you want to pierce it through the center of the wax paper circle and place head side down in the bottom of the cake pan. Spray the bottom of the cake pan undernieth the wax paper and then replace the wax paper and spray it. Only spray the bottom of the cake pan and not the sides. When a cake is baking it needs something to cling to as it rises and if you bake the cake fully it will pull away from the sides on it's own.

2) Once your cake pans are ready mix the cake as directed by the package. It is important to follow the altitude adjustments. If you don't know what your altitude is you can go here to find out or search the name of your city online. Depending on which layer you are making first either leave the batter white or add red or blue food coloring. Make sure you scrape down the sides of the bowl as you mix in the food coloring so it is even. With the blue you want to get it pretty dark, the same with the red. If you don't use enough red food coloring your cake will turn out pink.

3) Pour your cake batter into your prepared cake pan filling at least 2/3 full if not 3/4. Don't fill all the way to the top or you will have a mess on your hands. Once you have the batter in the cake pan apologize to your neighbor down stairs, if you have any, and pound your cake pan on the counter. This causes air bubbles to rise up and out of the cake batter. It really does work and helps your cake become more dense when you get rid of the extra air.


4) Bake your cake as directed keeping a close eye on it. Don't check on your cake too much during the cooking process or you may cause it to fall. If it's still jiggly on top after you've cooked it for so long, cook it longer. Before you ever poke it with a toothpick lightly press your finger on the top to see if the cake springs back. If it leaves a finger print cook a little longer. Only as a final resort do you prick the cake with a tooth pick. You don't want to prick it too early so as not to cause it to fall while rising. If the tooth pick comes out clean remove from the oven and let cool for about 10min in the pan. You can run a spatula along the edges to loosen a little and then tip upside down and let the cake fall out. Remove the wax paper and flower nail and then return to the upright position on a cooling rack.

Once your cake is fully cooled, wrap it in plastic wrap and place in the freezer. Repeat the cooking process for all three cake mixes.

Now for the fun part!

5) Once all your cake it made and has been sitting in the freezer for about 30 minutes or so. Take your cakes from the freezer and unwrap them. You'll want to level the cake if it is very tall. I put my cakes back in the pan and held a knife to the top edge using it as a guide if your cake doesn't reach the top of your pan for this method of leveling you'll have to eyeball it and try to make it a straight cut.


6) ***Read step fully before cutting*** Next you want to cut your white and red layers in half so you have two circles instead of one. So if your cake is about 2 inches tall you want to make each new layer 1 inch tall. Please don't cut your cake in half and end up with two halves of a circle, that would be bad.

7) For the blue layer we're going to cut a circle out of the middle. Find a bowl, cup, lid or something you can use as a guide while cutting. Make sure the circle you will cut out is about half the size of the cake in diameter. You don't want to take out a big circle or too small of a circle. But it's easier to fix if you take out a small circle and want to make it bigger later on.

This blue layer is to be the blue part of the flag so you want it to be a nice square shape. Cut out your circle and gently remove it from the rest of the cake leaving a cake doughnut essentially.

8) Now we stack the cake. Cover your cardboard cake circle with tin foil. Place a small dollop of frosting in the middle of your cake circle and spread out into a small circle. This will hold your cake to the board.

Place the bottom layer of either the white or red layers onto your cake board centering it, bottom side down. Put a large dollop of frosting on top of your first layer and spread it out to cover the whole top. Next take the bottom layer of the opposite color and place it bottom side up on top of the first layer. Then spread frosting on top of this layer.


Next you want to put on your blue layer centering it and being very gentle so as not to break it in half. Place it bottom side up so the top of your cake will be flat.

Using the same guide you used to make the circle in the blue layer, make circles in the remaining top layers of the red and white cake. This time you want the doughnut hole instead of the doughnut.

You want to place the small circle of the next color in your pattern of red and white in the center of the blue cake. Pressing it down firmly. Put some white frosting in one of the piping bags attaching a large star tip. Pipe an even layer of frosting on top of the small circle you just put on the cake. Now place your final small circle on top of the layer we just did and press down firmly.

9) Now you want to dirty ice your take or put a crumb coat on your cake. This is a very thin layer of frosting covering the entire cake. It's OK if you get crumbs everywhere that is why it is called a crumb coat. All this layer does is seal in the crumbs so they don't spread to the rest of your cake when you go to frost it, making your frosting look speckled. After you put on the crumb coat put your cake in the freezer for at least 15 minutes.

This is a good time to clean up the mess you've been making. If you feel guilty about throwing away the extra cake you can cut it into pieces and take it to your work or send it with your significant other to their job for their coworkers to eat.

10) Once your crumb coat has hardened it is time to decorate. You can decorate your cake however you like but I'll tell you how I decorated mine. I had a small amount of fondant left from a previous cake I made so I rolled out a circle and covered just the top of my cake to make it smooth and flat. (If you want to cover your cake in fondant go to my fondant recipe to learn how to make some.) Then I pipped some white frosting onto the sides in long spread out strips. I then smoothed these lines to give an even coast of white frosting on the sides of the cake. I then proceeded to press colored coconut onto the wet frosting.

(I colored my coconut by using a couple tablespoons of water and a few drops of red food dye. Once it was fully mixed I spread it on a cookie sheet and set it in a warm oven to dry out a little.)
For my boarder around the top of the cake I piped white and blue stars. My coconut turned out a little pink so it might be cuter to make the coconut blue and pip red and white starts on the top instead.


Once you are done decorating your cake cut a few slices out of the cake so when guests arrive for your 4th of July celebration they can see the amazing flag on the inside!


This cake is kind of difficult because of all the pieces you have to put together but if you don't rush and don't stress it will turn out great and everyone will love it! Leave me a comment about what you think of this cake and if you try it how things worked out for you.

Have a wonderful 4th of July!


Friday, June 14, 2013

Frozen Cookie Dough

Baking and eating cookies is one of my favorite things to do. There is nothing better than a fresh from the oven cookie. When I make the time to bake cookies I find that my recipe makes more dough than I intended. I don't like to make all of the dough because my husband and I can't eat them fast enough before they go stale. Sometimes I'll bake all the cookies and freeze half the batch. But even a precooked thawed cookie isn't as good as a fresh one from the oven.
Maybe some of you have also been in this predicament. Well I found a solution to my problem with an idea given to me by my friend Kenzie Gray.

Kenzie was a personal assistant to a lady who had Kenzie essentially be the mom. She would cook dinner, do the grocery shopping and even some finances. Because Kenzie didn't work on the weekends the lady still wanted fresh baked cookies to have on hand. So Kenzie would freeze cookie dough balls and when this family wanted cookies they'd take out the desired amount and bake fresh cookies.

I though this was such a clever idea I had to try it and share it with you. So here is how to have delicious fresh from the oven cookies at your disposal.


Here is what do to:
First - Make your favorite cookie dough. I like chocolate chip. Once you have your dough separate it into individual balls with a cookie scoop. I have a small scoop which yields about 6 dozen cookies.
Second - Place all the balls on a cookie tray. Make sure the tray can fit into your freezer. You can pack the cookie sheet full because the cookies are not going to expand. I also lined my cookie tray with wax paper so they didn't stick.
Third - place your tray of cookie dough balls in the freezer and leave there for a good hour to harden.
Once they're frozen transfer the balls into a freezer bag and place the bag back in the freezer to use at a later time.


When you want some home made cookies take out the amount of balls you want and let them thaw on a cookie sheet, bake and enjoy some fresh warm cookies!

*Baking Tip: Because the dough is in a ball you want it to unthaw a little if not all the way so it will bake evenly. You can also try baking your cookies at a lower temperature. For example, mine bake at 375 so I would bake my partially thawed cookies at 350. *


You could also freeze your dough in a long cylinder shape and cut slices to desired size for cookies, but I find this way more convenient. Also having the dough already in individual balls makes for a fun easy treat. ;-)

Let me know how this idea works out for you or if you've already heard/though up this idea on your own.